
WordPress is the most popular content management system (CMS) in the world, powering over 40% of all websites. However, its popularity also makes it a prime target for hackers who want to exploit its vulnerabilities and compromise its users’ data.

According to a report by Sucuri, WordPress accounted for 94% of all hacked websites in 2019. Some of the common reasons why WordPress sites get hacked are:
- Outdated WordPress core, plugins, and themes
- Weak passwords and user permissions
- Malicious or poorly coded plugins and themes
- Lack of security measures and best practices
If your WordPress site gets hacked, you may face serious consequences, such as:
- Loss of traffic, revenue, and reputation
- Blacklisting by search engines and browsers
- Legal issues and fines
- Data theft and ransomware
Therefore, it is essential to secure your WordPress site and prevent hackers from accessing it. In this article, we will share some of the best practices and tips to improve your WordPress security and protect your site from hackers.
Keep WordPress, Plugins, and Themes Updated
One of the easiest and most effective ways to secure your WordPress site is to keep it updated. WordPress releases new versions regularly to fix bugs, improve performance, and add new features. However, these updates also include security patches that address the latest vulnerabilities and threats.
If you don’t update your WordPress core, plugins, and themes, you are leaving your site exposed to hackers who can exploit the known security holes and gain access to your site. According to a study by WPScan, 52% of WordPress vulnerabilities are related to plugins, 37% to core, and 11% to themes.
To update your WordPress core, plugins, and themes, you can follow these steps:
- Log in to your WordPress dashboard and go to Updates.
- Check if there are any available updates for WordPress core, plugins, or themes. If there are, click on Update Now or Update All.
- Alternatively, you can enable automatic updates for WordPress core, plugins, and themes by adding the following lines to your wp-config.php file:
define( 'WP_AUTO_UPDATE_CORE', true );
add_filter( 'auto_update_plugin', '__return_true' );
add_filter( 'auto_update_theme', '__return_true' );- However, before updating your WordPress site, make sure to backup your site first, in case something goes wrong or breaks your site.
Use Strong, Unique Passwords and User Permissions
Another common way hackers can access your WordPress site is by guessing or cracking your passwords and user credentials. If you use weak, default, or reused passwords for your WordPress admin, FTP, or database accounts, you are making it easy for hackers to break into your site.
To protect your WordPress site from brute force attacks, you should use strong, unique passwords and user permissions for each account. A strong password should be:
- At least 12 characters long
- A mix of uppercase and lowercase letters, numbers, and symbols
- Not based on personal or common information, such as names, dates, or words
- Different from your other passwords
To create and manage strong passwords, you can use a password manager tool like LastPass or 1Password. These tools can generate and store your passwords securely, so you don’t have to remember them or write them down.
Additionally, you should also limit the number and role of users who can access your WordPress site. You should only give access to trusted and necessary users, and assign them the appropriate user roles and capabilities. WordPress has six default user roles: Administrator, Editor, Author, Contributor, Subscriber, and Super Admin. Each role has different permissions and access levels to your site.
To manage your WordPress users, you can follow these steps:
- Log in to your WordPress dashboard and go to Users.
- Check the list of users and their roles. If you see any suspicious or unwanted users, delete them or change their roles.
- To add a new user, click on Add New and fill in the required fields. Choose the role that suits the user’s needs and responsibilities.
- To edit an existing user, hover over the user’s name and click on Edit. You can change the user’s details, password, and role.
- Alternatively, you can use a plugin like User Role Editor or Members to create custom user roles and permissions for your WordPress site.
Enable Two-Factor Authentication (2FA)
Two-factor authentication (2FA) is a security feature that adds an extra layer of protection to your WordPress login page. With 2FA, you need to provide two pieces of information to log in to your site: your password and a one-time code sent to your phone or email.
This way, even if hackers manage to steal or guess your password, they still can’t access your site without the second factor. 2FA can significantly reduce the risk of brute force attacks and unauthorized logins.
To enable 2FA for your WordPress site, you can use a plugin like Google Authenticator or Jetpack. These plugins can integrate with various 2FA methods, such as SMS, email, or app-based codes. You can also choose which users or roles need to use 2FA to log in to your site.
To enable 2FA for your WordPress site using Google Authenticator, you can follow these steps:
- Install and activate the Google Authenticator plugin from the WordPress plugin directory.
- Log in to your WordPress dashboard and go to Users > Your Profile.
- Scroll down to the Google Authenticator Settings section and check the Active checkbox.
- Choose the type of 2FA method you want to use: app, email, or both.
- If you choose app, you need to install the Google Authenticator app on your phone and scan the QR code displayed on the screen. The app will generate a six-digit code that you need to enter every time you log in to your site.
- If you choose email, you need to enter your email address where you want to receive the code. The plugin will send you a six-digit code that you need to enter every time you log in to your site.
- If you choose both, you need to do both steps above. You can use either the app or the email code to log in to your site.
- Click on Update Profile to save your changes.
Install a Security Plugin
A security plugin is a plugin that can help you enhance your WordPress security and protect your site from various threats and attacks. A security plugin can perform various functions, such as:
- Scanning your site for malware and vulnerabilities
- Blocking malicious traffic and requests
- Implementing firewall and brute force protection
- Hardening your site’s settings and configuration
- Logging and monitoring your site’s activity and events
- Restoring your site from backups
There are many security plugins available for WordPress, such as Wordfence, Sucuri, and iThemes Security. These plugins offer different features and pricing plans. You can choose the one that best suits your site’s needs and budget.
To install a security plugin for your WordPress site, you can follow these steps:
- Log in to your WordPress dashboard and go to Plugins > Add New.
- Search for the security plugin you want to install, such as Wordfence or Sucuri plugin.
- Click on Install Now and then Activate.
- Go to the plugin’s settings page and configure the options according to your preferences and requirements.
- Run a security scan and fix any issues or recommendations.
Regularly Backup Your Site
Backing up your site is a crucial step to secure your WordPress site and prevent data loss. A backup is a copy of your site’s files and database that you can restore in case something goes wrong or your site gets hacked.
By backing up your site regularly, you can ensure that you always have a working version of your site that you can restore quickly and easily. This can save you a lot of time, money, and hassle in the event of a disaster.
To backup your WordPress site, you can use a plugin like UpdraftPlus or BackupBuddy. These plugins can help you backup your site automatically and manually, and store your backups in various locations, such as your server, cloud, or email. (I have also written a PHP script for small to medium sized blogs which can email you your backups via cronJob. Let me know from my contact page if you want me to send it to you.)
To backup your WordPress site using UpdraftPlus, you can follow these steps:
- Install and activate the UpdraftPlus plugin from the WordPress plugin directory.
- Log in to your WordPress dashboard and go to Settings > UpdraftPlus Backups.
- Click on the Backup Now button to create a manual backup of your site. You can choose to include or exclude the files and database in the backup.
- To set up an automatic backup schedule, go to the Settings tab and choose how often you want to backup your files and database. You can also choose how many backups you want to keep.
- To choose where to store your backups, go to the Settings tab and select the remote storage option you prefer, such as Dropbox, Google Drive, or Amazon S3. You may need to authenticate and authorize the plugin to access your storage account.
- Click on Save Changes to save your backup settings.
Limit Login Attempts
By default, WordPress allows unlimited login attempts to your site. This means that hackers can try to guess your password as many times as they want, using automated tools or scripts. This is called a brute force attack, and it can eventually crack your password and compromise your site.
To prevent brute force attacks, you should limit the number of login attempts to your site. This way, you can block hackers from trying to log in to your site after a certain number of failed attempts. You can also lock them out for a specific period of time or permanently. This not only protects your site but also saves your server resources.
There are several plugins available that can help you limit login attempts. For instance, the ‘Limit Login Attempts Reloaded‘ plugin is a popular choice among WordPress users. Once installed, you can configure the settings to determine the maximum number of login attempts before a user is blocked, and the duration of their block. I myself use Google ReCaptcha on my login pages.
Remember, while limiting login attempts can significantly improve your site’s security, it’s just one piece of the puzzle. Always combine it with other security measures such as strong passwords, two-factor authentication, and regular updates to ensure maximum protection for your WordPress blog.
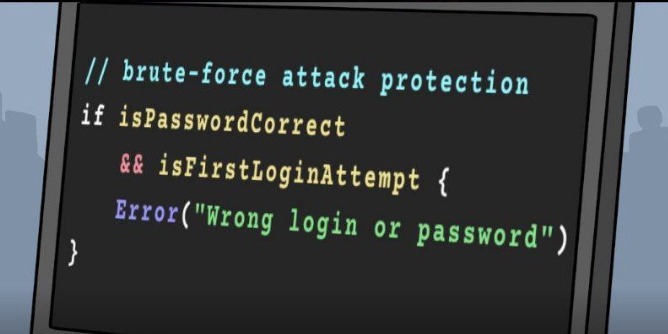
Another crazy but very useful trick is to not allow a login on First Attempt. This way brute-forcing bots would move on with next try and a real human (that is you) would enter the password again.
Remove Unused Themes and Plugins
Keeping unused themes and plugins can provide potential security vulnerabilities. It’s best to remove them if they’re not in use.
In website management, it’s not that uncommon for one to experiment with various themes and plugins. However, once you’ve settled on the ones that best suit your needs, any remaining unused themes and plugins can become more of a liability than an asset.
Unused themes and plugins, while seemingly harmless, can actually pose potential security vulnerabilities. They can become gateways for malicious attacks if they are not regularly updated or monitored. This is because outdated software often has security loopholes that hackers can exploit.
Therefore, it’s highly recommended to remove any themes and plugins that are not in active use. By doing so, you’re effectively reducing the number of potential entry points for attacks, thereby bolstering your website’s overall security.
Remember, in web management, cleanliness is next to godliness. Keeping your website clean from unused add-ons is a simple yet effective step towards maintaining a secure and efficient website.
Remove WordPress Generator Tag
The WordPress generator tag is a piece of code that WordPress automatically adds to the head section of your website’s HTML. It’s used to display the version of WordPress that your site is currently running. While this might not seem like a big deal, it can potentially provide hackers with useful information if you’re running an older version of WordPress that has known security vulnerabilities.
Here are the steps to remove the WordPress generator tag:
Method 1: Using a WordPress Plugin
- Install and activate the Remove WP Generator Meta Tags plugin.
- Once activated, the plugin will automatically remove the generator tag from your site’s code.
Method 2: Manually Removing the Tag
If you prefer not to use a plugin, you can remove the generator tag manually by adding a small piece of code to your theme’s functions.php file:
function remove_wordpress_version() {
    return '';
}
add_filter('the_generator', 'remove_wordpress_version');
This code creates a new function that returns an empty string instead of the WordPress version, effectively removing the generator tag.
Remember, before making any changes to your functions.php file, it’s always a good idea to back up your site or use a child theme to prevent any potential issues.
File Permissions
File permissions are a crucial aspect of website security. They dictate who can read, write, and execute the files on your server. Incorrect file permissions can inadvertently give unwanted access they need to modify your files, leading to potential security breaches.
Here are some steps you can take to ensure your file permissions are set correctly:
- Understand the Basics: File permissions are typically represented by a three-digit code, with each digit ranging from 0 to 7. Each digit represents the permissions for the user, the group, and others, respectively. The permissions include read (4), write (2), and execute (1). The absence of a permission is represented by 0.
- Check Current Permissions: You can check the current permissions of a file using the
ls -lcommand in the terminal. The output will show the permissions for the user (owner), group, and others. - Set Correct Permissions: As a rule of thumb, files should be set to 644 (read and write for the user, and read for the group and others) and directories to 755 (read, write, and execute for the user, and read and execute for the group and others). You can set these permissions using the
chmodcommand followed by the permission code and the file or directory name. - Monitor Changes: Regularly monitor your file permissions to ensure they remain correct. You can use security plugins that notify you of any changes to your file permissions.
Setting correct file permissions is a simple yet effective way to enhance your website’s security.
Monitor Your Site
Regular monitoring of your website is a proactive way to ensure its security. This involves keeping an eye out for any unusual activity, such as unexpected changes in your server’s error logs, multiple failed login attempts, or sudden spikes in server resource usage. Here are some ways you can effectively monitor your site:
- Check Server Error Logs: Server error logs can provide valuable insights into what’s happening on your website. They record all errors encountered by your server, making them a useful tool for spotting unusual activity. For example, a sudden increase in 404 errors could indicate that a hacker is trying to find a page to exploit.
- Monitor Login Attempts: Keeping track of login attempts can help you identify brute force attacks, where hackers try to gain access by guessing your password. There are plugins available that can limit the number of login attempts from a single IP address, and notify you of any suspicious activity.
- Use a Website Monitoring Tool: There are numerous website monitoring tools available that can check your website at regular intervals and alert you if it goes down. Some can even simulate user journeys to test complex interactions like form submissions or e-commerce transactions.
- Monitor Server Resources: Keep an eye on your server’s resource usage. A sudden spike in CPU usage, for instance, could indicate a DDoS attack. Tools like
htopornmoncan provide real-time information about your server’s resource usage. - Set Up Email Notifications: Most Content Management Systems (CMS) allow you to set up email notifications for certain events, such as a change in your website’s core files or a user locking themselves out due to too many failed login attempts.
- Regular Scanning: Regularly scan your website for malware or other security threats. You can scan your site for free on Sucuri Scan it checks your URL and shows you the results.
By regularly monitoring your site, you can spot and address issues before they escalate, keeping your website secure and your peace of mind intact. You can also install this browser extension to highlight hidden links, it is coded by me and available for free to find hidden links inside your website.
Database Security
When it comes to securing your WordPress website, the database is a critical component that often gets overlooked. Here are two key steps you can take to enhance your database security:
- Change the Default WordPress Database Prefix: By default, all WordPress database tables start with ‘wp_’. This is a well-known fact and can make your site an easy target for SQL injection attacks. Changing the default prefix can make it harder for hackers to guess your table names. You can do this during the WordPress installation process or later using a WordPress security plugin. Remember to back up your database before making any changes to avoid data loss.
- Use Strong Database Passwords: Your database password is as important as your WordPress admin password. It should be complex, long, and unique. Consider using a mix of uppercase and lowercase letters, numbers, and special characters. Avoid using common words or phrases. You can use a password manager to generate and store strong passwords.
Every layer of security you add makes your website that much harder to breach. So, don’t overlook your database; it’s a vital part of your website that needs protection.
Implement a Firewall
A Web Application Firewall (WAF) is a powerful tool that can help block malicious traffic before it reaches your site. It acts as a shield between your website and the internet, filtering out harmful traffic based on a set of rules.
Steps to implement a WAF or use Cloudflare’s inbuilt firewall feature:
- Choose a WAF Provider: There are many WAF providers available, each with their own strengths and weaknesses. Cloudflare is a popular choice due to its robust security features and ease of use.
- Sign Up and Set Up: Once you’ve chosen a provider, sign up for their service. You’ll then need to set up your website with the WAF. This usually involves changing your website’s DNS settings to point to the WAF provider.
- Configure Your Firewall: After setup, you can configure your firewall settings. This includes setting up security levels, challenge passages, and IP access rules. Be sure to review these settings carefully to ensure they meet your website’s needs.
- Enable Cloudflare’s Inbuilt Firewall: If you’re using Cloudflare, you can take advantage of their inbuilt WAF. Navigate to the “Firewall” tab in your Cloudflare dashboard and set the security level to “Medium” or “High”. You can also enable “I’m Under Attack Mode” if your website is experiencing a DDoS attack.
- Monitor and Adjust: Once your WAF is up and running, monitor its performance regularly. Make adjustments as needed to ensure it’s effectively blocking malicious traffic without hindering legitimate users.
Implementing a WAF is a critical step in securing your website. It’s your first line of defense against malicious attacks, so take the time to set it up properly and keep it updated. Your website’s security is worth the effort.
Secure Data Transfer
For securing your website the security of data transfer is also important. One of the most effective ways to ensure secure data transfer is by installing an SSL (Secure Sockets Layer) certificate on your website. This is a digital certificate that provides authentication for a website and enables an encrypted connection.
Here are the steps to install an SSL certificate:
- Purchase an SSL Certificate: SSL certificates are issued by Certificate Authorities (CAs). You can purchase one from trusted CAs like DigiCert, Comodo, or You can generate your own. (I will write a new blog post on how to use self signed certificates. But if you are using Cloudflare then they do provide a Free SSL)
- Generate a Certificate Signing Request (CSR): A CSR is a block of encoded text that is given to a CA when applying for an SSL Certificate. It usually contains information like your organization’s name, domain name (website address), locality, and country.
- Apply for the SSL Certificate: Submit the CSR to the CA. The CA will validate your details and issue an SSL certificate for your website.
- Install the SSL Certificate: Once you’ve received your SSL certificate, you’ll need to install it on your server. This process varies depending on your hosting provider and server setup.
- Update Your Website to Use HTTPS: After installing the SSL certificate, you’ll need to update your website to use HTTPS instead of HTTP. This may involve updating links, redirects, and other settings.
- Verify the Installation: Finally, verify that the SSL certificate is correctly installed and working. You can do this by visiting your website and checking for the padlock icon in the address bar.
The SSL certificate is not a one-time setup. It needs to be renewed periodically to ensure continuous data protection.
Finally
Securing your WordPress installation is not just a necessity but a responsibility. By following the steps outlined in this article, you can ensure that your website stands strong against potential threats. Remember, security is not a one-time task but an ongoing commitment. Regular updates, constant monitoring, and timely renewals of security certificates like SSL are crucial.
In the digital world, where data breaches are becoming increasingly common, taking these steps to secure your WordPress site can provide your users with a safe browsing experience, thereby building trust and credibility for your brand.
Stay vigilant, stay updated, and most importantly, stay secure.