
If you are a wordpress plugin developer or want to become one then you have to use subversion tool to upload/manage/update your plugin on WordPress Plugins Repository. Subversion is a kind of version control system that would help you to track changes to your code over the time.
I will try and explain it in simple steps on how to interact with it in order to upload and manage your WordPress plugins.
What is Subversion?
Subversion or SVN is a free and open-source version control system. It helps you to track code changes, manage its multiple versions and team up with other developers for development. It is especially beneficial for managing WordPress plugins since it enables developers to easily update and repair vulnerabilities.

Connecting to the WordPress Subversion Repository
In order to use Subversion to manage your WordPress plugins you will need to connect to the WordPress Subversion repository.
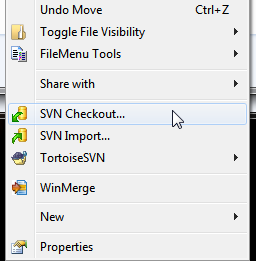
- Install Subversion: The first step is to install Subversion on your computer. I use Tortoise SVN
- Checkout the Repository: Now using TortoiseSVN you can right click on the folder and select “Checkout” (This will be the folder where your existing code and structure will be downloaded). If its a new plugin then you can checkout any other simple plugin like Hello Dolly to get the file/folder structure on to your hard-drive.
- Enter The Details: Enter the URL of the repository (I have one so giving its URL example here https://plugins.svn.wordpress.org/custom-messages-in-rss-feed/)
Editing/Updating Your Plugin
- Readme.txt Make sure you are following the readme.txt standards set by WordPress. Fill in all details/Edit details if necessary. Make sure to update the stable tag and licence details in it.
- Copy/Update Your Code Files The files inside the “trunk” folder are the ones that are code files. So you can edit/update this files here.
Uploading The Plugin with Subversion
- Now right click on the main folder and select “SVN Commit” from it. Add an optional comment and press submit.
- It will now ask for your wordpress account details (This are WordPress Developer Account Details)
Testing It
After successfull upload/update of your files from your local copy to the WordPress systems. You can create another blank folder somewhere else and checkout the updated wordpress plugin.
If there are any problems with your plugin or its code (As they have updated some coding standards) then the WordPress plugins team will email you with the suggested changes. Try to address as many issues as possible before resubmitting it to WordPress.